Although Visual Basic 2019 is a programming language designed for creating business and other industrial applications, it can be used to create animation. In the preceding lesson, we have actually learned how to create animation using the timer. In fact, the programs we have created in the previous lesson such as the stopwatch and the digital dice are animated programs. In this lesson, we shall show you more advanced animated programs.
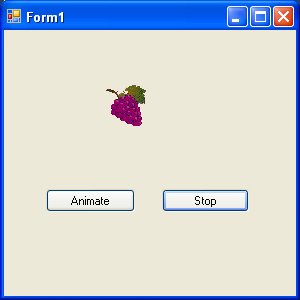
We can create a moving object using the timer. The motion can be from left to right or from top to bottom motion or diagonal. First, insert a picture box into the form. In the picture box properties window, select the image property and click to import an image in your storage devices such as your hard drive. We have inserted an image of a bunch of grapes. Next, insert the Timer control into the form and set its Interval property to 100, which is equivalent to 0.1 seconds. Finally, add two buttons to the form, name one of them as AnimateBtn and the other one as StopBtn, and change to caption to Animate and Stop respectively.
We make use of the Left property of the picture box to create the motion. PictureBox.Left means the distance of the PictureBox from the left border of the Form . Now click on the Timer control and type in the following code:
Private Sub Timer1_Tick(ByVal sender As System.Object, ByVal e As System.EventArgs) Handles Timer1.TickIf PictureBox1.Left < Me.Width ThenPictureBox1.Left = PictureBox1.Left + 10

Else

PictureBox1.Left = 0

End If
End Sub
In the code above, Me.Width represents the width of the Form. If the distance of the PictureBox from the left is less than the width of the Form, a value of 10 is added to the distance of the PictureBox from the left border each time the Timer tick, or every 0.1 seconds in this example. When the distance of the PictureBox from the left border is equal to the width of the form, the distance from the left border is set to 0, which move the PictureBox object to the left border and then move left again, thus creates an oscillating motion from left to right. We need to insert a button to stop motion. The code is:
Timer1.Enabled = False
To animate the PictureBox object, we insert a button and enter the following code:
Timer1.Enabled = True
The runtime interface

Private Sub BtnRoll_Click(sender As Object, e As EventArgs) Handles BtnRoll.Click

Timer1.Enabled = True

End Sub

Private Sub Timer1_Tick(sender As Object, e As EventArgs) Handles Timer1.Tick
Dim t As Integer
t = 0
Do

MyPicBox.Refresh()

Dim n As Integer
Dim myPen As Pen

myPen = New Pen(Drawing.Color.DarkTurquoise, 10)
Dim myGraphics As Graphics = MyPicBox.CreateGraphics
n = Int(6 * Rnd()) + 1

Select Case n

Case 1
myGraphics.DrawEllipse(myPen, 80, 80, 10, 10)

Case 2
myGraphics.DrawEllipse(myPen, 40, 40, 10, 10)
myGraphics.DrawEllipse(myPen, 120, 120, 10, 10)

Case 3
myGraphics.DrawEllipse(myPen, 40, 40, 10, 10)
myGraphics.DrawEllipse(myPen, 80, 80, 10, 10)
myGraphics.DrawEllipse(myPen, 120, 120, 10, 10)

Case 4
myGraphics.DrawEllipse(myPen, 40, 40, 10, 10)
myGraphics.DrawEllipse(myPen, 120, 40, 10, 10)
myGraphics.DrawEllipse(myPen, 40, 120, 10, 10)
myGraphics.DrawEllipse(myPen, 120, 120, 10, 10)
Case 5
myGraphics.DrawEllipse(myPen, 40, 40, 10, 10)
myGraphics.DrawEllipse(myPen, 120, 40, 10, 10)
myGraphics.DrawEllipse(myPen, 80, 80, 10, 10)
myGraphics.DrawEllipse(myPen, 40, 120, 10, 10)
myGraphics.DrawEllipse(myPen, 120, 120, 10, 10)

Case 6
myGraphics.DrawEllipse(myPen, 40, 40, 10, 10)
myGraphics.DrawEllipse(myPen, 120, 40, 10, 10)
myGraphics.DrawEllipse(myPen, 40, 80, 10, 10)
myGraphics.DrawEllipse(myPen, 120, 80, 10, 10)
myGraphics.DrawEllipse(myPen, 40, 120, 10, 10)
myGraphics.DrawEllipse(myPen, 120, 120, 10, 10)
End Select
t = t + 1
Loop Until t > 1000
Timer1.Enabled = False
End Sub
The runtime interface is as shown in Figure 33.2
Public Class Form1
Dim m, a, b, c As Integer
Private Sub BtnSpin_Click(sender As Object, e As EventArgs) Handles BtnSpin.Click
Timer1.Enabled = True
End Sub

Private Sub Timer1_Tick(sender As Object, e As EventArgs) Handles Timer1.Tick
m = m + 10
If m < 1000 Then

a = Int(1 + Rnd() * 3)

b = Int(1 + Rnd() * 3)

c = Int(1 + Rnd() * 3)

Select Case a
Case 1
PictureBox1.Image = Image.FromFile("C:\Users\admin\Documents\vb2019\images\strawberry.jpg")
Case 2
PictureBox1.Image = Image.FromFile("C:\Users\admin\Documents\vb2019\images\grape.jpg")
Case 3
PictureBox1.Image = Image.FromFile("C:\Users\admin\Documentsvb2019\images\apple.jpg")

End Select

Select Case b
Case 1
PictureBox2.Image = Image.FromFile("C:\Users\admin\Documents\vb2019\images\strawberry.jpg")
Case 2
PictureBox2.Image = Image.FromFile("C:\Users\admin\Documents\vb2019\images\grape.jpg")
Case 3
PictureBox2.Image = Image.FromFile("C:\Users\admin\Documents\vb2019\images\apple.jpg")

End Select
Select Case c
Case 1
PictureBox3.Image = Image.FromFile("C:\Users\admin\Documents\vb2019\images\strawberry.jpg")
Case 2
PictureBox3.Image = Image.FromFile("C:\Users\admin\Documents\vb2019\images\grape.jpg")
Case 3
PictureBox3.Image = Image.FromFile("C:\Users\admin\Documents\vb2019\images\apple.jpg")

End Select

Else
Timer1.Enabled = False
m = 0
If a = b Then
LblMsg.Text = "Good Luck! You won $200!"
ElseIf a = c Then

LblMsg.Text = "Good Luck! You won $500!"
ElseIf b = c Then

LblMsg.Text = "Good Luck! You won $1000!"

ElseIf a = b And b = c Then

LblMsg.Text = “Jackpot! You won $1,000,000!"
Else
LblMsg.Text = “No luck, try again”

End If
End If

End Sub
End Class
The run-time interface is shown in Figure 33.3

Copyright©2008 Dr.Liew Voon Kiong. All rights reserved |Contact|Privacy Policy