FTP stands for File Transfer Protocol .The File Transfer Protocol is a system for transferring files between two computers connected by the Internet .One of the computers is known as the server and the other one is the client. The FTP program is very useful for website management. The webmaster can update the web pages by uploading the local files to the web server easily , at a much faster speed than the web browser. For normal PC users, the FTP program can also be used to download files from many FTP sites that offer a lot of useful stuff such as free software, free games, product information, applications, tools, utilities, drivers, fixes and more.
The FTP program usually comprises an interface that shows the directories of the local computer and the remote server. Files can be transferred just by clicking the relevant arrows. To log into the FTP site, we have to enter the username and the password; however, for public domains, we just need to type the word anonymous as the username and you can leave out the password. The FTP hostname takes the form ftp.servername.com, for example, the Microsoft FTP site’s hostname is ftp.microsoft.com .If you need to use an FTP program, you can purchase one or you can download a couple of the programs that are available free of charge from the Internet. However, you can also create your very own FTP program with Visual Basic. Visual Basic allows you to build a fully functionally FTP program which may be just as good as the commercial FTP programs.
The engine behind is the Microsoft Internet Transfer Control 6.0 in which you need to insert it into your form before you can create the FTP program. The name of the Microsoft Internet Transfer Control 6.0.is Inet and if you only put in one control, its name will be Inet1.
Inet1comprises three important properties namely Inet1.URL that is used to identify the FTP hostname, inet1.UserName that is used to accept the username and the Inet1.Password that is used to accept the user’s passwords. The statements for the program to read the hostname of the server, the username and the password entered into Textbox1, Textbox2 and Textbox3 by the user are shown below:
Inet1.URL=Text1.Text

Inet1.UserName=Text2.Text

Inet1.Passoword=Text3.Text
After the user entered the above information, the program will attempt to connect to the server using the following commands, where Execute is the method and DIR is the FTP command that will read the list of files from the specified directory of the remote computer and you need to use the getChunk method to actually retrieve the directory’s information.
Inet1.Execute, "DIR
After connecting to the server, you can choose the file from the remote computer to download by using the statement below:
Inet1.Execute, , "get" & remotefile & localfile
where remotefile is the file of the remote site and localfile is the file of the local system. However, very often you need to provide the full path of the local file, which you can do that by modifying the above syntax to the following syntax:
Inet1.Execute , , "get" & remotefile & localpath & remotefile
The above statements will ensure that the remote file will be downloaded to the location specified by the localpath and the file downloaded will assume the same name as the remote file. For example, if the remote file is readme.txt and the localpath is C:\temp , so the downloaded file will be saved in C:\temp\readme.txt.
In order to monitor the status of the connection, you can use the StateChanged event that is associated with Inet1 together with a set of the state constants that are listed in Table 34.1.
| Constant | Value | Description |
|---|---|---|
| icHostResolvingHost | 1 | The control is looking up the IP address of the specified host computer. |
| icHostResolved | 2 | The control successfully found the IP address of the specified host computer. |
| icConnecting | 3 | The control is connecting to the host computer. |
| icConnected | 4 | The control successfully connected to the host computer. |
| icRequesting | 5 | The control is sending a request to the host computer. |
| icRequestSent | 6 | The control successfully sent the request. |
| icReceivingResponse | 7 | The control is receiving a response from the host computer. |
| icResponseReceived | 8 | The control successfully received a response from the host computer. |
| icDisconnecting | 9 | The control is disconnecting from the host computer. |
| icDisconnected | 10 | The control successfully disconnected from the host computer. |
| icError | 11 | An error occurred in communicating with the host computer. |
| icResponseCompleted | 12 | The request has been completed and all data has been received. |
Under the StateChanged event, you use the Select Case…End Select statements to notify the users regarding the various states of the connection. The code is shown below:
Private Sub Inet1_StateChanged(ByVal State As Integer)

Select Case State
Case icError
MsgBox Inet1.ResponseInfo, , "File failed to transfer"
Case icResolvingHost
Label6.Caption = "Resolving Host"
Case icHostResolved
Label6.Caption = "Host Resolved"
Case icConnecting
Label6.Caption = "Connecting Host"
Case icConnected
Label6.Caption = "Host connected"
Case icReceivingResponse
Label6.Caption = "Receiving Response"
Case icResponseReceived
Label6.Caption ="Got Response"
Case icResponseCompleted
Dim data1 As String
Dim data2 As String
MsgBox "Download Completed"
End Select

End Sub
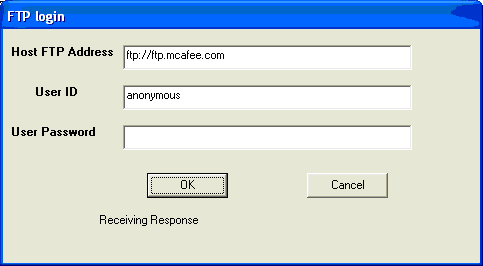
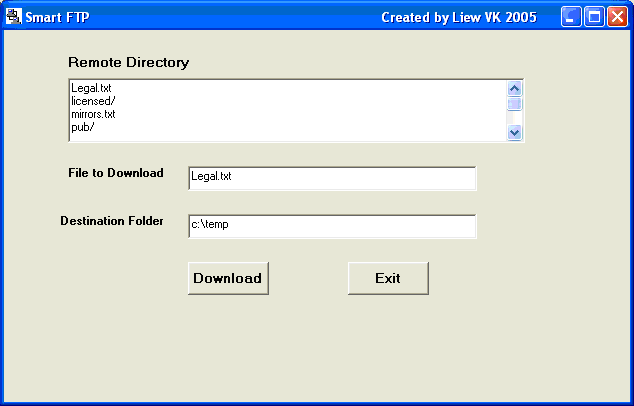
The FTP program that I have created contains a form and a dialog box. The dialog box can be added by clicking on the Project item on the menu bar and then selecting the Add Form item on the drop-down list. You can either choose a normal dialog box or a login dialog box. The function of the dialog box is to accept the FTP address, the username and the password and then to connect to the server. After successful login, the dialog box will be hidden and the main form will be presented for the user to browse the remote directory and to choose certain files to download.
The interface of the login dialog is shown on the right.

The code for the login dialog is :
Option Explicit
Private Sub OKButton_Click()
Inet1.URL =Text1.Text
Inet1.UserName = Text2.Text
Inet1.Password =Text3.Text
Inet1.Execute , "DIR"
Form1.Show
Dialog.Hide
End Sub

Private Sub Inet1_StateChanged(ByVal State As Integer)
Select Case State
Case icError
MsgBox Inet1.ResponseInfo, , "File failed to transfer"
Case icResolvingHost
Label6.Caption ="Resolving Host"
Case icHostResolved
Label6.Caption ="Host Resolved"
Case icConnecting
Label6.Caption ="Connecting Host"
Case icConnected
Label6.Caption = "Host connected"
Case icReceivingResponse
Label6.Caption ="Receiving Response"
Case icResponseReceived
Label6.Caption ="Got Response"
Case icResponseCompleted
Dim data As String
Dim data1 As String
MsgBox "Transfer Completed"
data1 =Inet1.GetChunk(1024, icString)
data =data & data1
Loop While Len(data1) <> 0
Form1.Text6.Text = data
End Select
End Sub

Private Sub
CancelButton_Click()
Text1.Text = ""
Text2.Text = ""
Text3.Text = ""
End Sub

retrieve
The statement data1= Inet1.GetChunk (1024, icString) is to use the getChunk method to grab information of the remote directory and then display the files of the directory in Textbox6.
After logging in, the main form will be presented as shown in the image below:

Copyright©2008 Dr.Liew Voon Kiong. All rights reserved |Contact|Privacy Policy