
Before writing an event procedure for a control in Visual Basic 2012 to response to a user's input or action, you have to set certain properties for the control to determine its appearance and how it will work with the event procedure. You can set the properties of the controls in the properties window of Visual Basic 2012 IDE at design time or at run time. Figure 3.1 is the typical properties window for a form. It refers particularly to interface of the Addition Calculator program you have learned in the previous lesson:
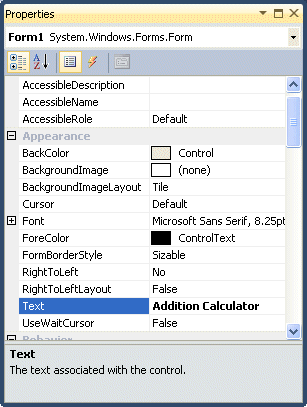
The title of the form is defined by the Text property and its default name is Form 1. To change the form's title to any name that you like, simple click in the box on the right of the Text property and type in the new name, in this example, the title is Addition Calculator. Notice that this title will appear on top of the windows. In the properties window, the item appears at the top part is the object currently selected (in Figure 3.1, the object selected is Form1). At the bottom part, the items listed in the left column represent the names of various properties associated with the selected object while the items listed in the right column represent the states of the properties. Properties can be set by highlighting the items in the right column then change them by typing or selecting the options available. You may also alter other properties of the form such as font, location, size, foreground color, background color ,MaximizeBox, MinimizeBox and etc. You can also change the properties of the object at runtime to give special effects such as change of color, shape, animation effect and so on.
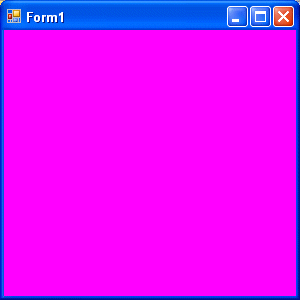
For example, the following code will change the form color to yellow every time the form is loaded. Visual Basic 2012 uses RGB(Red, Green, Blue) to determine the colors. The RGB code for yellow is 255,255,0. Me in the code refer to the current form and Backcolor is the property of the form's background color. The formula to assign the RGB color to the form is Color.FormArbg(RGB code). The event procedure is as follows:
Public Class Form1 Private Sub Form1_Load(ByVal sender As System.Object, ByVal e As System.EventArgs) Handles MyBase.Load

  Me.BackColor = Color.FromArgb(255, 0, 255)

End Sub

End Class
You may also use the follow procedure to assign the color at run time.
Private Sub Form1_Load(ByVal sender As System.Object, ByVal e As System.EventArgs) Handles MyBase.Load
  Me.BackColor = Color.Magenta
End Sub
Both procedures above will load the form with a magenta background as shown in Figure 3.2
Here are some of the common colors and the corresponding RGB codes, as shown in Table 3.1. You can always experiment with other combinations, but remember the maximum number for each color is 255 and the minimum number is 0.
| Color | RGB code | Color | RGB code | Color | RGB Code |
|---|---|---|---|---|---|
| 255,0,0 | 255, 255, 0 | 255, 165, 0 | |||
| 0,255,0 | 0, 255, 255 | 0, 0, 0 | |||
| 0, 0, 255 | 255, 0, 255 | 255, 255, 255 |
The following is another program that allows the user to enter the RGB codes into three different textboxes and when he or she clicks the display color button, the background color of the form will change according to the RGB codes. The output is shown in Figure 3.3.
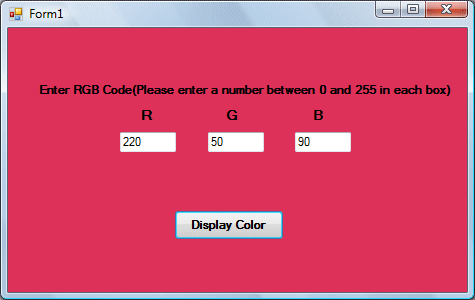
Private Sub Button1_Click(ByVal sender As System.Object, ByVal e As System.EventArgs) Handles Button1.Click
 Dim rgb1, rgb2, rgb3 As Integer
 rgb1 = TextBox1.Text
 rgb2 = TextBox2.Text
 rgb3 = TextBox3.Text
 Me.BackColor = Color.FromArgb(rgb1, rgb2, rgb3)
End Sub
Copyright©2008 Dr.Liew Voon Kiong. All rights reserved |Contact|Privacy Policy