Creating Database Using ADO Control
Learn to create powerful database applications with ADO Control for flexible and cross-platform database solutions
Lesson Overview
Key Takeaway
ADO (ActiveX Data Objects) provides a more flexible and powerful approach to database programming in VB6, allowing access to various data sources beyond traditional databases.
Welcome to Lesson 25 of our Visual Basic 6 Tutorial! In this lesson, you'll learn how to create database applications using ADO Control, which offers more flexibility than the standard Data Control. ADO works with various data sources and can be used across different platforms and programming languages.
25.1 Introduction to ADO Control
ADO stands for ActiveX Data Objects. Unlike the standard Data Control, ADO can work with many different kinds of data including:
Web Data
Data displayed in Internet browsers
Email Text
Access and manage email content
Graphics
Work with graphical data beyond traditional databases
25.1.1 Adding ADO Control to Toolbox
To use ADO data control, you need to insert it into the toolbox:
1Open Components Dialog
Press Ctrl+T to open the Components dialog box
2Select ADO Control
Check Microsoft ActiveX Data Control 6
3Confirm
Click OK to add ADO control to your toolbox
25.2 Building a Library Application
We'll create a library application to demonstrate ADO capabilities. First, name the new form as frmBookTitle and change its caption to Book Titles - ADO Application.

25.2.1 Property Settings
Here are the property settings for our library application:
| Control Property | Setting |
|---|---|
| Form Name | frmBookTitle |
| Form Caption | Book Titles - ADO Application |
| ADO Name | adoBooks |
| Label1 Name | lblApp |
| Label1 Caption | Book Titles |
| Label 2 Name | lblTitle |
| Label2 Caption | Title : |
| Label3 Name | lblYear |
| Label3 Caption | Year Published: |
| Label4 Name | lblISBN |
| Label4 Caption | ISBN: |
| Label5 Name | lblPubID |
| Label5 Caption | Publisher's ID: |
| Label6 Name | lblSubject |
| Label6 Caption | Subject : |
| TextBox1 Name | txtitle |
| TextBox1 DataField | Title |
| TextBox1 DataSource | adoBooks |
| TextBox2 Name | txtPub |
| TextBox2 DataField | Year Published |
| TextBox2 DataSource | adoBooks |
| TextBox3 Name | txtISBN |
| TextBox3 DataField | ISBN |
| TextBox3 DataSource | adoBooks |
| TextBox4 Name | txtPubID |
| TextBox4 DataField | PubID |
| TextBox4 DataSource | adoBooks |
| TextBox5 Name | txtSubject |
| TextBox5 DataField | Subject |
| TextBox5 DataSource | adoBooks |
| Command Button1 Name | cmdSave |
| Command Button1 Caption | &Save |
| Command Button2 Name | cmdAdd |
| Command Button2 Caption | &Add |
| Command Button3 Name | cmdDelete |
| Command Button3 Caption | &Delete |
| Command Button4 Name | cmdCancel |
| Command Button4 Caption | &Cancel |
| Command Button5 Name | cmdPrev |
| Command Button5 Caption | &< |
| Command Button6 Name | cmdNext |
| Command Button6 Caption | &> |
| Command Button7 Name | cmdExit |
| Command Button7 Caption | E&xit |
25.3 Connecting to Database
To connect ADO to a database file (we'll use BIBLIO.MDB that comes with VB6):
1Open Properties
Click on the ADO control and open properties window
2Set ConnectionString
Click on ConnectionString property to open Property Pages
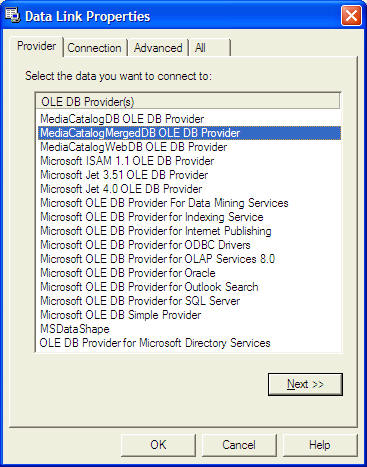
3Select Provider
Choose "Use Connection String" then click Build

At the Data Link dialog box, double-click the option labeled Microsoft Jet 3.51 OLE DB provider. Then click Next to select the file BIBLO.MDB. Finally, click on the RecordSource property and set the command type to adCmd Table and Table name to Titles.

25.4 Writing Code for Command Buttons
After setting up the interface and database connection, we need to write code for the command buttons:
25.4.1 Save Button
Private Sub cmdSave_Click()
    adoBooks.Recordset.Fields("Title") = txtTitle.Text
    adoBooks.Recordset.Fields("Year Published") = txtPub.Text
    adoBooks.Recordset.Fields("ISBN") = txtISBN.Text
    adoBooks.Recordset.Fields("PubID") = txtPubID.Text
    adoBooks.Recordset.Fields("Subject") = txtSubject.Text
    adoBooks.Recordset.Update
End Sub
25.4.2 Add Button
Private Sub cmdAdd_Click()
    adoBooks.Recordset.AddNew
End Sub
25.4.3 Delete Button
Private Sub cmdDelete_Click()
    Dim Confirm As Integer
    Confirm = MsgBox("Are you sure you want to delete this record?", vbYesNo, "Deletion Confirmation")

    If Confirm = vbYes Then
        adoBooks.Recordset.Delete
        MsgBox "Record Deleted!", , "Message"
    Else
        MsgBox "Record Not Deleted!", , "Message"
    End If
End Sub
25.4.4 Cancel Button
Private Sub cmdCancel_Click()
    txtTitle.Text = ""
    txtPub.Text = ""
    txtPubID.Text = ""
    txtISBN.Text = ""
    txtSubject.Text = ""
End Sub
25.4.5 Previous Button
Private Sub cmdPrev_Click()
    If Not adoBooks.Recordset.BOF Then
        adoBooks.Recordset.MovePrevious
        If adoBooks.Recordset.BOF Then
            adoBooks.Recordset.MoveNext
        End If
    End If
End Sub
25.4.6 Next Button
Private Sub cmdNext_Click()
    If Not adoBooks.Recordset.EOF Then
        adoBooks.Recordset.MoveNext
        If adoBooks.Recordset.EOF Then
            adoBooks.Recordset.MovePrevious
        End If
    End If
End Sub
Lesson Summary
In this lesson, you've learned how to create database applications using ADO Control in VB6:
ADO Advantages
More flexible than Data Control, works with various data sources
Setup Process
Adding ADO control to toolbox and connecting to databases
Application Design
Building a complete library application with record manipulation
Database Connection
Configuring ConnectionString and RecordSource properties
Important Note
ADO provides a more modern approach to database programming in VB6 and supports connection to various data sources beyond traditional databases, including web data and email content.
Practice Exercises
Enhance your ADO database application with these exercises:
Exercise 1: Connection Testing
Add a "Test Connection" button to verify the database connection before proceeding.
Exercise 2: Record Count
Display the total number of records in a status bar or label.
Exercise 3: Search Function
Implement a search feature to find books by title or ISBN.
Exercise 4: Data Validation
Add validation to ensure required fields are filled before saving.
Exercise 5: Error Handling
Implement proper error handling for database operations.
Next Lesson
Continue your VB6 journey with Lesson 26: DataGrid Control.
Related Resources

Visual Basic 6 Made Easy
Start your programming journey with Visual Basic 6. Learn how to build Windows applications step-by-step using an easy and beginner-friendly approach.
- Perfect for beginners
- Learn core programming concepts
- Build real VB6 applications

Visual Basic 2026 Made Easy
Upgrade to modern Visual Basic with VB.NET, .NET 10, and Visual Studio 2026. Build real-world applications with modern tools and AI-powered development.
- Modern VB.NET development
- Hands-on projects and real apps
- GitHub Copilot & AI integration
🚀 Ready for the Next Level?
After learning the basics with VB6 Made Easy and upgrading to VB2026 Made Easy, continue your journey into advanced professional development.

Advanced VB.NET Programming
Take your VB.NET skills to the next level. Learn advanced programming techniques, real-world architectures, and professional development practices using modern .NET.
Best For:
- After VB6 or VB.NET fundamentals
- Intermediate to advanced learners
- Developers building real-world systems
🚀 Migrating from VB6 to VB.NET
Still using or learning classic Visual Basic 6? This practical step-by-step guide shows you how to migrate legacy VB6 applications to modern VB.NET with Visual Studio 2026 and .NET 10.

VB6 to Modern VB.NET Made Easy
A practical step-by-step guide to migrating legacy Visual Basic 6 applications to VB.NET with Visual Studio 2026 and .NET 10.
- Designed for VB6 programmers and legacy app maintainers
- Clear migration guidance from classic VB to modern .NET
- Perfect bridge between VB6 fundamentals and VB.NET development
🚀 Move to Modern VB.NET
Visual Basic 6 is your foundation — but modern development uses VB.NET with .NET and Visual Studio 2026.
Start VB.NET Tutorial →